VPN (Virtual private network) is a widely used network protocol, particularly in the business environment, to provide secure and encrypted access to a central network for remote offices or users. In order to build a communication channel, both ends must use the same method and setup.
To mask the originating device IP address and encrypt your actions by sending them via an alternate VPN server identified by the VPN application you are using, a VPN application is used. Creating, editing, and deleting VPN connections is something you should learn how to do as the need arises.
It is not possible to set up VPN connections on any other operating system using these “How to” instructions which are specific to the Windows 8 operating system. It’s a complicated technology. Using your Internet Service Provider or the company server to establish a VPN connection for work-related purposes is covered in great detail in this article.
Preparation
You are going to learn and understand how VPN works in the process of setting up the VPN connection, you need your originating servers and the IP address from your system network. Apps for virtual private networks (VPNs) can either do this automatically for you or not at all. You can simplify the process by using a VPN app that takes care of setting up your VPN connection for you.
- If you want to establish a VPN connection, you must have access to the domain name and IP address of the destination. If you work for Contoso, you need this information ready when setting up your VPN connection to the server. This information will come in handy as we look at the screenshots that follow.
- Call the contoso.com Contoso VPN server at Internet Protocol address 10.0.0.25.
- If you’re using a personal computer and your Internet service provider, pick a VPN server from the list provided by VPN App instead.
- Your username and password are both required.
- To connect to a VPN server at your company or the one with which you will communicate via tunneling and encryption over your Internet provider, you must be connected to the internet.
- A smart card may be required by some businesses. Before attempting to connect to your company, make sure you have a smart card reader attached to your computer.
- As a rule, no smart cards or other intermediary identification devices are used by private Internet service providers. Your log-in credentials, username, and password should be adequate.
Setting up a VPN connection on a computer
To establish a brand-new virtual private network (VPN) connection:
1. Locate the Network icon in the taskbar and select Properties from the menu that appears. When using Windows, look for the network icon near the bottom of the taskbar on the right side. Click Network and Sharing Center to open it.
2. In the Network and Sharing Center, look for the Change your networking settings option. Set up a Connection or Network by Tapping the Set up a New Connection or Network.
3. Select Choose a connection option and then select Connect to a workplace.
4. Let’s find out how you want to connect. Start by selecting Use my Internet connection (VPN).
5. Either use the corporate VPN connection that was just set up, or create a new VPN connection using the configuration wizard. Instead of making a VPN connection, you can either use the one you see or do nothing.
6. Type the IP address of the VPN server you wish to connect to, followed by the Internet address you want to use to connect to that server. Give the VPN connection a name you’ll remember in the Destination name option. This will make it easier to locate the connection later. Consider using a Contoso VPN connection for your business’s VPN server or FlashVPN for your encryption to mask a personal VPN server. Don’t forget to check all of the checkboxes to make your situation fit your desired setup.
7. You’re all set to click Create now. You should now see the newly configured VPN network connection on the Networks screen after clicking this.
Use VPN to connect
Left-clicking on the network icon in the system tray opens the configured VPN connection on the desktop with ease. You can see your VPN connection by selecting it and then clicking the Networks tab in the Networks sidebar. After selecting the VPN connection, click Connect, Network Authentication on the shortcut menu that appears on your computer’s left side. Use the format DOMAIN/User name to enter your username. Once you’ve entered your password, you’ll be tunneling encrypted data through the server.
Creating a new VPN connection from the Start menu
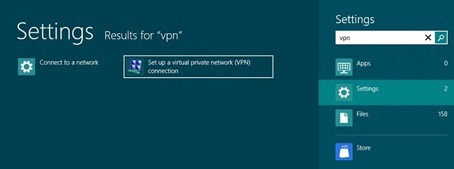
Another way to set up a VPN profile in Windows 8 is to use the Get Connected Wizard. Use the Start button and then tap the SETTINGS icon to open the wizard, and then type VPN into the Settings window that appears. How to connect to a virtual private network (VPN) by tapping the Set up a VPN connection button.
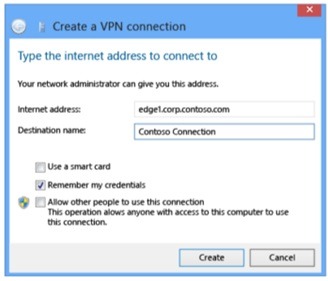
When you select the Set Up a Virtual Private Network (VPN) Connection, A dialogue box will appear with the title Create a VPN Connection.
Fill in the blanks in each block with the information you gathered during the earlier preparation phase. Recall that the Remote Access server’s IP address or fully qualified domain name can be employed. Find the domain name or IP address by going to if you’ve already configured a VPN connection.
After your first successful connection, you can instruct the computer to remember your VPN credentials by selecting the checkbox for Remember Credentials
The Get Connected Wizard, as mentioned in the introduction to this article, automates many of the manual settings you’ve been making and saves them in registry entries for later use. As a result, the START button method automatically negotiates authentication and tunneling protocols between the VPN server and your computer. The Connection Properties dialogue box can be used to make changes to these protocols after they have been set up
Using an Existing Corporate Network VPN Connection
1. Move your computer’s cursor to the upper- or lower-right corner to bring up the Charms dialog box. You can also use the Win+C keyboard shortcut to get there.
2. In the bottom right-hand corner of the screen, click Settings, and then click the network icon
3. Select the desired VPN connection in Networks. After that, click on the Connect button
When you click Connect, a connection is established with the server based on the credentials you’ve previously saved. If you didn’t check the Remember Credentials box when setting up the connection, you’d have to manually type in your credentials every time you used that connection.
how to clear the cached credentials after making a change to your login credentials by right-clicking and selecting the Clear Cached Credentials option.
Editing VPN Passwords
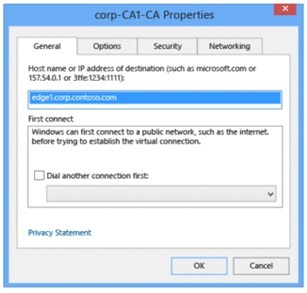
There are four tabs to choose from when using Connection Properties. From left to right, click each tab and then perform the following steps: The VPN connection properties can be accessed by selecting the connection from the context menu when you right-click on it. Click View Connection Properties in the Networks view to bring up the dialogue box to access Connection Properties.
General Tab
Configure an interface to a public network and alter the VPN server’s hostname or IP address.
Options
Configure the point-to-point protocol (PPP) and decide whether or not credentials should be cached.
Security
Install and configure the necessary software for configuring tunnels, authentication, and encryption.
Networking
Configure protocols. TCP/IPv4 and TCP/IPv6 are the most widely used protocols.
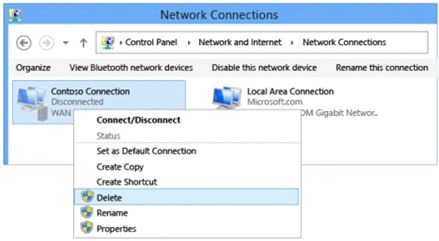
Delete / Remove a link from your network
Click Search in Charms, type VPN, and then click View Network Connections under Settings in the Start screen’s Charms search field.

